When finishing your brick wall, you have a choice not only of the colour mortar that you use but of the profile you give the joints themselves. Different mortar joint profiles not only affect the look of your brickwork, but can affect its overall durability and water resistance too. Selecting the right joint profile for your brick project is an important part of achieving a finished aesthetic which is both beautiful and practical. We take you through some of the most common ones here.
The time taken for the mortar to stiffen enough to tool varies but is usually around 10-30 minutes. It should be stiff enough that it keeps its shape when tooled and does not stick to the tool, but not so stiff that it crumbles at all when worked.
Flush
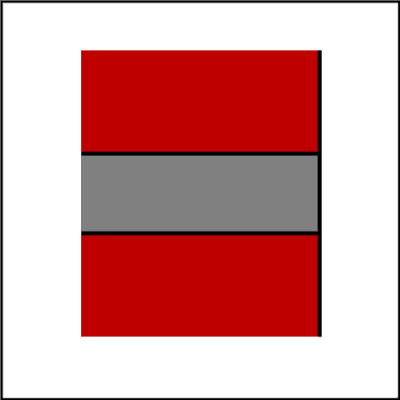
A flush joint is one of the most simple to do as no extra tooling is required. It is where the mortar is just left “flush” to the facing side of the bricks. It is commonly used where the texture of the brick is very rough or the wall is intended to be plastered or painted. Because the mortar has not been tooled, it has not been pressed or compacted into the surface of the brick as much. As a result, it does the mortar more open to water penetration or weathering, and so should only be used where the wall is in a more sheltered location.
Bucket Handle

Aka curved, concave, half-round tooled. Another very common mortar joint profile, the bucket handle gives a straightforward and eye-pleasing finish to bricks with a smoother face. With a negligible decrease in the load bearing area of the mortar, it improves weather resistance as the mortar has been compressed and pressed into the surface of the bricks. This means it is suitable for any level of exposure. A purpose-made jointing tool should be used as, while people often use makeshift tools to achieve this effect, they will lead to an inconsistent finish.
Raked
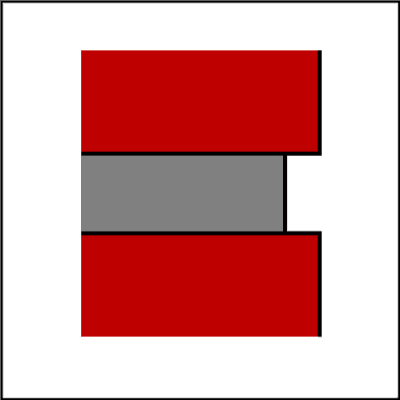
Aka recessed, square recessed. Raked joints are usually achieved using a wheeled jointing tool to get a consistent depth of recess followed up with another tool to slightly compress the joint to strengthen it. Around 4-5mm is about right, and certainly don’t go much over that. This type of joint can be used to create more shadows where desired or emphasise the appearance of bricks with bevelled edges. However, the recesses make it difficult for rainwater to run down the wall, and leave areas where it can sit on top of the surface of the bricks too, making the wall much less resistant to water penetration and frost damage. This type of joint profile is only recommended for bricks which are very frost resistant (look for an F2 rating on the brick) and in locations which are nice and sheltered.
Struck
This type of joint profile is only used on the horizontal or bedded joints, and so emphasises the horizontal lines of the wall. It is frequently made by running a pointing trowel along the joints which also serves to compress the joint at the same time. It leaves a lot of the top surface of the bricks exposed so you don’t want to use this on any exterior wall as it does not allow adequate water runoff.
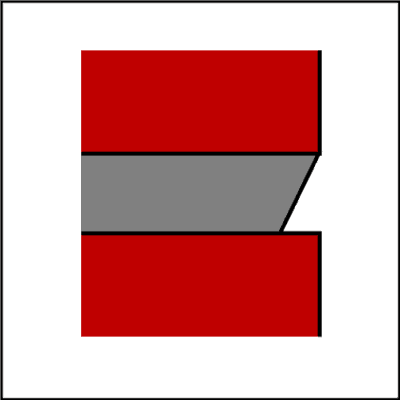
Weather Struck
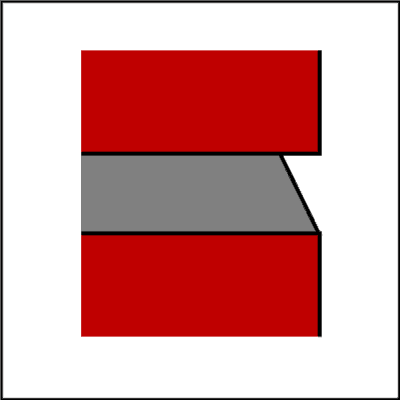
Aka, weathered, weathered struck. The opposite of the struck profile, weather struck is achieved in the same way but with an upward facing slope which aids water runoff and allows the mortar to catch the light more. This makes it much more suitable for exterior use and is a popular choice. Leaving the bottom edges of the facing sides of the bricks out in the open, it emphasises the regular lines of well-formed bricks. However, with an increased surface area of mortar exposed as compared to, say, a bucket handle joint, it is more liable to need maintenance a bit sooner.
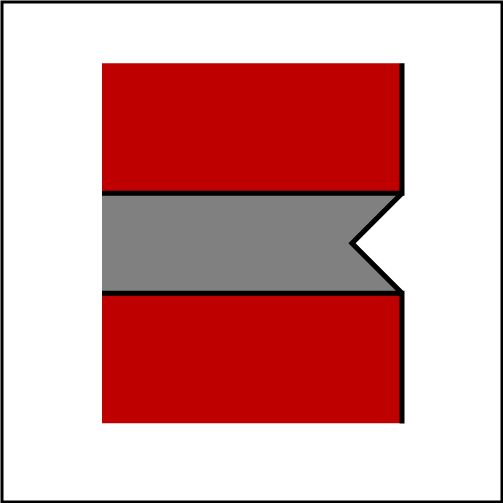
Ironed

Aka V, Vee. Made with a special V-jointing tool, this mortar joint profile is both decorative and practical when it comes to water runoff. It’s effectively an alternative to the bucket handle joint with the sharper lines giving a different aesthetic depending on the final finish desired.
Although there are many more mortar joint profiles in use today for both new builds and restorative work, this guide has taken you through some of the most widely used and recognised joint profiles, all of which can be achieved with no more than a cheap pointing tool (often less than a fiver).
If you have any questions about the Landmark range or need any further advice, we are happy to support you at every stage, so feel free to give us a call or send us a message by our contact page here.